Tuesday, April 16, 2013

Left Overs...

 I have finally figured out what to do with the left overs!

No, I'm not talking about dinner left overs. I'm talking about the left over plastic you get when you trim down a pocket page protector.   I created an accordion foldout with the left over plastic!


At times when working on Project Life the stories  take up more room than the typical 2 page spread allows for.  I always want to cram the pictures into the 2 page spread instead of creating an insert because the thought of trimming a pocket page protector made me cringe because of the left over plastic.  

I have punched holes in the left over plastic and added it to my album BUT the insert does not turn over very smoothly AND the holes need to be punched into the 4x6 space. In other words there was no spine on the plastic for the holes.   I understand that for other 'Project Lifers' (that is what people call us) this isn't necessarily a problem but for me it was.  My little kids need to be able to turn the pages with ease.    
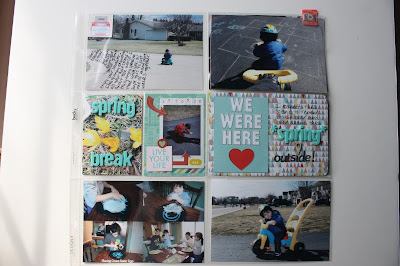
I took a ton of photos on Saturday and created a collage as well as an accordion foldout.  The bottom right pocket is where the foldout is.  I attached a piece of washi tape and added a puffy camera sticker as a 'handle' for the foldout.  I may go back and replace it with folded ribbon instead. I think the washi may not hold up over time.


When completely open the foldout looks just like part of the original page.


With the accordion foldout in addition to the collage I was able to include 7 pictures from Saturday!  
I made the accordion foldout using the 'leftovers' of a 6 pocket page protector.  I cut the bottom pocket in half, trimmed the edges at an angle and adhered it to the photo in the pocket.  You can do exactly the same thing with the 'leftovers' from a Design A pocket page protector and instead of a 4x6 pocket you will have 2 3x4 pockets in the middle section of the foldout!  The foldout can be placed inside any of the 4x6 pockets on the right side of a spread and in the top two pockets on the left side of a spread.  

I'm excited about this new way of adding more photos to my album!  
How do you use 'leftovers'? 
Today I'm linked up with The Mom Creative
Thanks for stopping by!
Marisol


Saturday, April 13, 2013

Project Life Week 11

Happy Saturday!  
*Scroll down to find the April 12 Project Life Celebratory Blog Hop post.*  

Today I'm participating in another Project Life Blog Hop hosted by  Michelle Bostinelos . Be sure to drop by her blog...it's fabulous!  

I barely picked up the camera during Week 11. We lost a dear family friend and most of the week was spent in mourning.  I am so grateful for the little moments I was able to capture and document.

Project Life 2013 Week 

I used the Citrus Twist March PL Kit
The kit was so full of color and complemented the photos of my boys playing together.
Week 11 Left Side
Most weeks my spreads are picture heavy leaving little room for embellished cards. But not this week!  I had fun getting creative with a few of the pockets.
In this pocket I adhered a 3x4 (custom made by Citrus Twist) card on a 4x6 card.  I embellished the 3x4 card with thickers, sequins, an opaque gem, an arrow sticker and a heart sticker. I even hand stitched around the arrow. It was easy and then I got ambitious and tried hand stitching on a layout...not so easy! Anyway I digress.  The camera was cut out from the Darling Dear collection by Studio Calico and attached to the 'Don't Forget' label from Pink Paislee.  I then arranged the stamps from the kit onto my block and stamped it repeatedly.  It says happy, playing,dreaming, learning, sharing, laughing.


I wanted to use a speech bubble to document something my daughter said.  I didn't have a 3x4 card that suited my need so I cut the speech bubble out from a 3x4 card and layered it over another 3x4 card. I then used an arrow stamp to create lines for the journaling.  Viola! Custom made journaling card!  After listening to 'We are never getting back together' by Taylor Swift my daughter said 'That is so sad because if you love someone you should be with them.'  She really does say the cutest things!

The right side of my spread is dedicated to our dear friend, Antonio, who lost his 4 year battle with cancer.  I used a WRMK page protector because I wanted to include the funeral book in it's entirety.  The pocket on the right is 6x12.  The booklet is not adhered to the cardstock I added but rather held in place with a Tim Holtz mini paperclip.  This way I can take out the booklet and read its content.  I included a picture of Antonio and his wife as well as a picture of the new Pope.  Antonio was a very religious person and we all thought it was beautiful that a new Pope was chosen on the day of his burial.  

Friday, April 12, 2013

The 2013 Project Life April Blog Hop

**UPDATE: I'm sharing this post over at The Mom Creative. She shared a post about setting up a baby album using PL products.  I thought I would share my youngest sons album too.

Welcome to the April 12 Project Life Celebratory Blog Hop! 

Today's blog is being hosted by the lovely Margie over at Nihao, Cupcake!

We are 1/4 of the way through 2013 and want to celebrate the progress we have made on our albums. Please join us in celebrating!  

Baby Album-Project Life Style

While taking photos of my current week I remembered that my youngest is turning two!  Like most moms in my situation my first thought was 'AWWW he is growing so fast!" and like most scrapping moms in my situation my second thought was 'I haven't even finished his baby album!'  

This is the intro page to the album.  He was just two days old! It is so hard to believe that at one point those socks fit his feet.


Before Becky Higgins, the creator of Project Life came out with the Baby Editions  of Project Life I was using the Turquoise Edition core kit and my paper and stamp stash to create his baby album.  Prompts from a traditional store bought baby book guided me as I created the album.  I decided early on that I wanted to include traditional 12x12 layouts, memorabilia, and different sized pages in addition to Design A pocket pages.  
Baby's First Picture
The picture of me in the right hand corner was taken 2 days before he was born! I used lots of letter stickers on this page.  I LOVE using letter stickers in my albums!
Baby Shower
I included the origami ducks that my co-worker created for the shower, as well as tags from some of the clothes and blankets received at the shower. I used a bifold card to tell the story of my work and family showers.
All about Mom and Dad.  
(I covered up our personal info.)  I included recent pictures of us as well as pictures from our dating years. The blank spot with the orange sticky is meant for a picture of the kids prior to the baby's birth.  Note to self...print that picture! HA.
Welcome Baby
I included our hospital bracelets (info is blurred) as well as the tag from his hospital crib.  On the right is the first 12x12 layout.

Meeting your siblings
I was inspired by this layout over at Twopeasinabucket.com and decided  to create a similar page for every month of the year. 
I used a stamp set to create the dates on the calendar and sticker elements  from a paper collection by Echo Park.  

My initial plan was to create weekly spreads just like my 2011 Family PL album.  I was plugging along on both albums until I returned to work in September.  
In Good Hands. Visitors.
I used the number stickers in the core kit on each picture to identify the name of the person in the picture on a journaling card.
Every month I include his length and weight as well as a picture of him at the Doctor's office.
By the time June rolled around I was starting to use a lot more of my supplies to make my own 3x4 cards.  I cut up the index print that came with my photo order and added them to the calendar!
He wore this onesie a lot!  I love that I was able to include another piece of memorabilia that he actually wore.  I just slipped the onesie into the page protector.  I didn't want to attach it with anything because I wanted the option of removing it from the page protector.
I already created the monthly title cards and the calendars for the rest of the year.  Many pictures are already printed and in the album.  I have also included many notes and my 2011 album will help me fill in any gaps.

Although the album is incomplete and my baby is now two I love this album and the progress I have made on it.  Completing the album is on my summer to do list.

Thanks for stopping by!
Marisol

Next in the blog hop is Brooke . Be sure to stop by all the blogs participating in today's hop!

Margie      http://xnomads.typepad.com
Maya        http://mayadahan.blogspot.com
Michelle    http://www.table-for-five.com/
Kristy      http://kmstewart.blogspot.com
Michelle R  http://MichelleRoger.wordpress.com
Emily        http://mrscraftyadams.blogspot.com
Barbara    www.maynardpl.blogspot.co.uk
Esau         http://www.twochicsandacricut.blogspot.com/
Michelle B   www.michellebostinelos.com/blog
Tina         http://tinasscrapcorner.blogspot.com/
Nicole       http://nicolemann.blogspot.ca
Marisol      www.mariclaudibenitez.blogspot.com <------ That's me!
Brooke       www.graceandlight.typepad.com
Scruptious   http://eversoscrumptiously.wordpress.com/
Rechelle     http://Levanfamily365.blogspot.com
Kelli        http://whimsikel.blogspot.com
Sonia        http://www.craftshandson.blogspot.com
Shay         http://sbookinshay29.blogspot.com
Rebekah   http://istampscrapcraft.wordpress.com/

Tuesday, April 2, 2013

Project Life Week 9

Welcome to another PL share!  
Today I'm sharing week 9 .  I have more completed weeks... just haven't photographed them yet.


Week 9

Left side Week 9
Lots of words on this page.  To  'unite' the 3 pictures I used the same alpha set and a star sticker on each photo. The placement of the yellow stars help guide the eye across the page.  My kids made ID Badges using a Hello stamp from Citrus Twist. They drew a picture of themselves and even created a bar code for the ID.  I keep the 3x4 grid cards all over the house and let the kids use them freely. It is a great way to get their drawings in the album without adding inserts or trimming the drawing.
Right side Week 9
I kept the right side very simple.  I let the pictures tell the story. After photographing this page I realized I did not add in the week # so I added it afterwards to the 'Enjoy the journey' card.
One thing I love about this project is that I can be as creative (or not) as I want to be.  Some weeks will be simpler than others! This week was simple. And that's OK with me!

Today I'm linked up with The Mom Creative.

Thanks for stopping by!
Marisol