Thursday, February 28, 2013

Project Life Week 6-Featuring Citrus Twist February PL Kit

Hola!  
Today I am sharing Week 6. I had a lot of fun working with the Citrus Twist PL February Kit.  With the exception of only a few items the spread was created using the kit.  There is so much left over and I'm not done with the month!  Which is perfect for me because I can use the left over items to fill in the gaps from 2011 and 2012.  I have a 'Staying Current while Catching up Plan' that I will share with you in the future.  Now let's get to the spread.
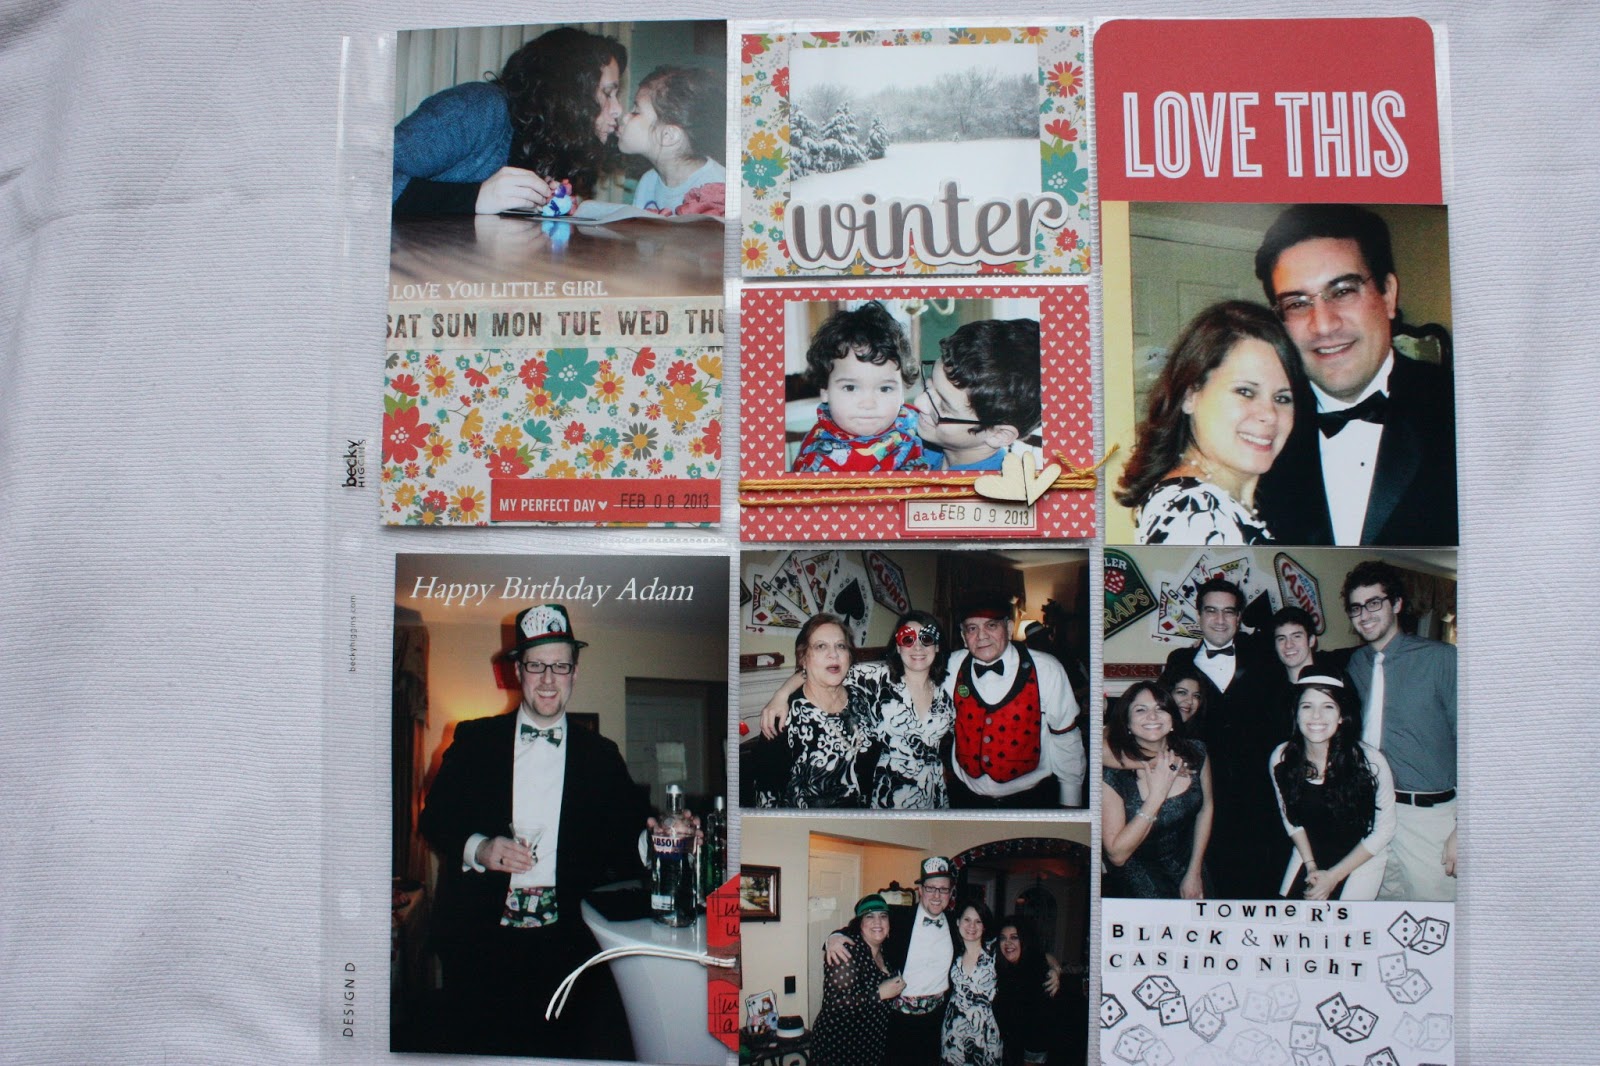
Project Life 2013 Feb Week 6

Close up of Week 6 
Design A


I used some layering on this 4x6.  The red is a 4x6 cardstock and the gray card is from the Pebbles journal cards included in the kit, the doily is also from the kit. I used 5 different stamps on this one card...can you find them?

 
On this card I used the days of the week stamp from the December Citrus Twist PL kit to document what happened in the week (the week in review). I like to do this because not every story will get it's own picture or pocket.


More layering on this card.  The arrows paper is from the Pebbles Seen and Noted 6x6 paper pad included in the kit. I layered the paper on a 4x6 cardstock and then matted the picture on a 3x4 card.  I inked up the wood veneer arrow with the Prima ink.  

Right side of  week 6 using Design D

I used more of the 6x6 paper pad on the right side of the spread.  The red strip of paper that says My Perfect Day is actually the paper strip that attaches the paper to the pad.  We had a Casino Night themed birthday for my brother in law and I was so excited to find the dice stamp in my collection! I used generation stamping with the dice stamp.  Generation stamping is when you repeatedly use the stamp without reinking it giving the image a fading effect. The 'Happy Birthday Adam' was added to the picture before printing it.  
Because I filled many pockets with pictures I didn't have much space for journaling.  So I got creative.  I found a red shipping tag that fit perfectly into the 3x4 pocket.  I like that it sticks out just a bit-it makes it easier to pull out and read the journaling.  

The 'Love You Little Girl' text was added to the picture using Picasa before printing.  The picture was actually a 4x6 horizontal-I just trimmed off  a couple of inches and attached it to a scrap piece of paper.  The days of the week washi tape is from last months CT kit.  

I'm almost  done with Week 7 and Week 8!  
Thanks for stopping by.
Marisol

Tuesday, February 26, 2013

Today I'm linked to Project Life Tuesday at The Mom Creative You can find TONS of Project Life inspiration there.
Thanks for stopping by.

Sunday, February 24, 2013

Project Life Kit set up

Hello friends,
As promised I am sharing my Project Life set up.  It is very simple and I like it that way.  I don't like spending tons of money on storage...I'd rather spend the money on pretty paper and I know I am NOT alone on that.  I subscribe to a Project Life Kit club.  I have ordered Becky Higgins core kits but become bored with the repetitiveness of the cards and found myself creating my own cards and looking for a variety of products to add to my PL album. And then I found Citrus Twist.
 
CT February PL Kit
The CT kit is PACKED.  And the stamps are PERFECT.  Every month you get an entire 6x6 paper pad along with a custom stamp set, 4x6 and 3x4 journaling cards (some of which are custom made), embellishments and a few 12x12 papers.  The customer service and community is so great.  I have been a member since Dec 2012 and I have been very pleased with the kits.  Did I mention I also sub to the main kit? CT also has a Blog which has weekly challenges, sneak peeks of upcoming kits, and tutorials; as well an opportunity to post your own projects.  Check it out there is always great inspiration.

Along with my kit I use some 'basics' from my stash, such as Alphabet stamps, date stamps, labels, etc.  I always keep these supplies out on my desk.  I use the Martha Stewart Desktop Organizers
My basic supplies: alpha stamps, 3x4 grid cards, ink
(I'll add a post on my clear stamp storage soon.)

When I get my monthly kit I add it to the organizer:

Organizer filled with CT February PL kit
For product that doesn't fit into my organizer I simply keep in the box it came in.  I keep the entire kit in the box until I'm ready to use it: 
or 
I use this method (fancy I know. HA) This is the CT February Main Kit.
This is the top of a Becky Higgins page protector box. 


 The page protectors are not packaged this way anymore. 

I have found it so much easier to work with the contents of a kit as opposed to looking through my stash all the time.  That seems to slow me down.  Although I don't always limit myself to the monthly kit- I also use my stash but generally stick to using the kit. I also find I'm more creative when I limit the supplies I use.  

Pocket Page Protectors: I have accumulated quite a collection over the years. I keep them in an old 12x12 3 ring binder.  They are so much easier to manage now.  
Well that is it! I told you it was simple!  
How did you set up for PL?


 Thanks for stopping by!

Thursday, February 21, 2013

PL 2013 January

When planning for this year's album I initially thought I would take the monthly approach again Like in 2012. And that is what I did for January.  It wasn't easy planning where the pics would go and so I decided to go back to the weekly approach like in 2011.  


January Left side

I also decided to pre-plan which page protectors to use in my album. I set up a variety of pocket pages in my album and will print my pictures accordingly.  I'll share a pic in a different post.  In 2011 I  found that I always printed my pictures to fill in Design A and I was visually bored but whenever I had an insert for the month I was visually interested again.  This left side uses Design F . Lots of Studio Calico January Project Life Kit and some Citrus Twist Kits.
January Insert 
This insert is Design G .


Back side of January Insert

One of the things I love about Project Life is that adding memorabilia to the pockets is so easy!  In this insert  I added the tag from the purse my hubby bought me for our anniversary. Adding movie tickets, business cards or your kids artwork is super easy!


Last page for January using Design A

In the third 3x4 pocket I inserted a paper bag and wrote the journaling on a shipping tag.  Also inside the paper bag is the Civil Air Patrol Pledge.  The Civil Air Patrol (CAP) is an auxiliary to the Air Force and my son is now a cadet!  I cut out the CAP emblem from the paperwork we received and adhered it to the the front of the bag.  In the top right pocket I created a month in review card where I listed some of the events that happened this month.
The second 3x4 pocket is quote by my four year old daughter.  This is how the conversation went: 
Claudia: Mom can I wear a dress?
Mom: Why do you always want to wear dresses?
Claudia: Because dresses are prettier than clothes and dresses make me look like a princess. And princesses wear dresses everyday!
That is so her!


January Insert #2 
Our 19th Wedding Anniversary was in Jan and my hubby gave me the most perfect card and a gorgeous purse.  I trimmed the card by about a 1/2 of an inch to fit it inside of the 8x8 page protector.  I trimmed a journaling card from Pebbles that I received in my Citrus Twist kit.  The beautiful hand made canvas heart is also from Citrus Twist.  I used stamps from the kit and journaled on a shipping tag which is in the little bag. The base for the page is a two sided patterned paper and I kept the back side as is.  
I only keep a few special cards throughout the year because otherwise the cards would add lots of bulk to the album.  Some Project Lifers (yes that is what we call ourselves) use these envelopes to store memorabilia          
I prefer to add most memorabilia right in the weekly spread.  

I'll be back to share my Project Life set up! 
After looking at this post I can see that you can't see the details very well. I'll figure something out for the next post.
Thanks for stopping by.


Wednesday, February 20, 2013

My very first post!

Well here it goes!  Thanks for the encouragement and support!
I will be sharing my Project Life Spreads on this blog and hope you'll come along for the adventure.
Those of you that know me know that I am passionate about memory keeping. I've been at it for 16 years!  I actually remember my first layout. Maybe one day I'll share it with you.  Anyway...currently I have been using Becky Higgins Project Life system to document our life and I love it.  The system has helped me document our life since 2009 (although I took a break for 2010). If you haven't heard about Becky Higgins and Project Life click here for more information.Project Life
I am using 2 Monthly Project Life Kits: Studio Calico and Citrus Twist. As well as items from my stash.
My PL 2013 Intro Page:


My cover page was inspired by Nicole Reaves (SC PL Design Team) .  Celebrating the New Year is a BIG deal in our family and so I had tons of pictures (of course).  I used the number cards from the January PL kit to create flip flaps and added more pictures. I used washi tape to hold the cards together. Thanks for looking! See you soon!